Don't forget that today is the last day to order from the 2009-2010 Idea Book & Catalog.. you have until 11:50 PM Mountain Time! There are hundreds of items retiring at the end of today. For the most up-to-date list, please visit my Stampin' Up! site here.
If you would like to purchase a 2010-2011 Idea Book & Catalog at a special rate, please let me know!
Wednesday, June 30, 2010
Saturday, June 26, 2010
Circle journal - 3 things I love about summer
Hello! I hope you are having a wonderful weekend!
I finally have Jessica's circle journal layout done. I had this 90% done for a couple of months! Can you believe... I really don't know why it took me so long, but oh well. Sorry!
It took me a little while too to figure out what I loved about summer. I am not a big fan of the sweltering summer heat and humidity! I do enjoy going to the beach, especially to watch the sun set.. going to the farmers' market and getting fresh, local produce.. and growing my own veggies!
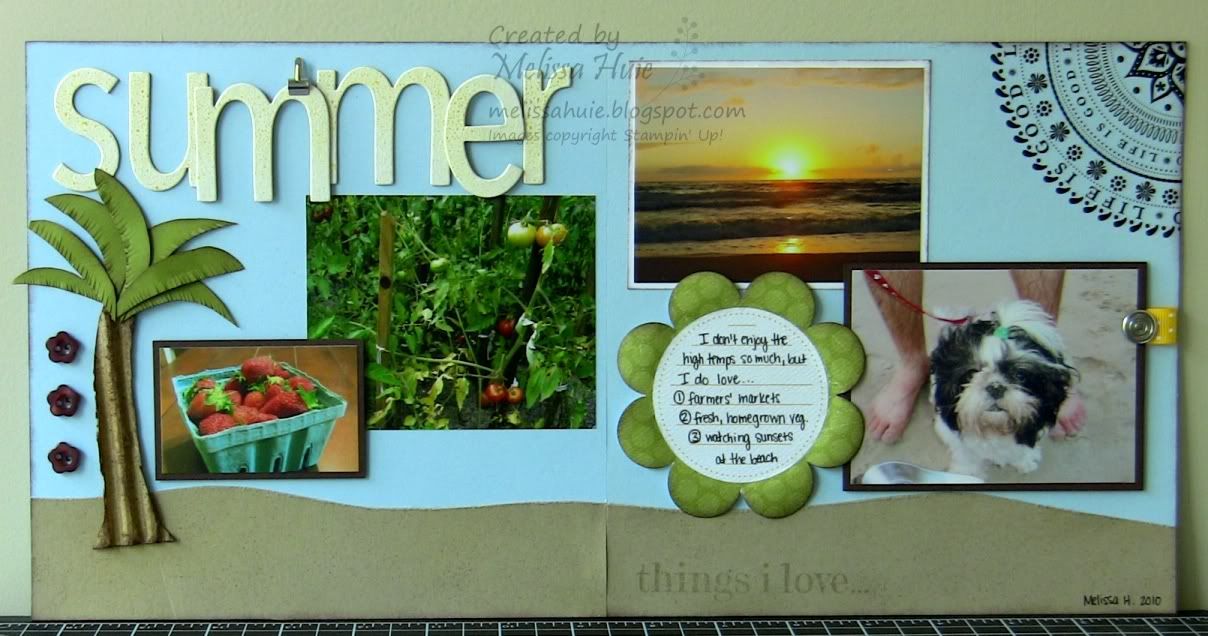
The strawberries we had bought from a local farmer a few weeks ago. If you've never had fresh, local strawberries that were picked when fully ripened.. you're missing out! There's a lot I could say on the subject, but let's just leave it at that. :) The picture of the tomatoes was taken last summer.. these were some of the first ripening tomatoes in our garden at Seth's parents' house. I'm missing this so much!
The other pictures are from when we went to Nags' Head a couple of summers ago. It was Fluffy's first time at the beach! She was scared of the ocean, and was just content sitting in the sand in the shade. :)
Like my palm tree? I roughly drew the tree trunk on a piece of cardboard from a box, then cut it out and pulled off one of the layers. Then I just inked it up and freehand drew some leaves and cut those out as well. I snipped into the leaves a little to make them more realistic. I think it turned out nicely!
The title letters I simply cut using the Simple Letters Bigz dies and chipboard, then covered with Whisper White Craft ink, embossing with White Stampin' Emboss powder. I created the "sand" by first using the freehand rotary blade in SU!'s Cutter Kit, then roughed up the edges with the distressing tool from the same kit. I then spritzed some Chocolate Chip ink onto it, then sprayed this and the letters with Gold Glow Smooch Spritz. I stamped "things i love..." from the Things I Love stamp set with Crumb Cake ink (new in the new catalog!), and I love how it almost looks like it was drawn in the sand.. if you can draw letters that perfectly. LOL
Here's my sign-in tag.. nothing really special I guess!

I'm in the homestretch for the CJ layouts. I think I have just three more to do - Jenn's, Lisa's, and Jean's!
Hope you like it, Jessica!
Circle journal layout supplies:
Stamps: Things I Love
Ink: Chocolate Chip and Crumb Cake (Kraft) Classic Stampin' Pads, Whisper White Craft Stampin' Pad
Paper: Bashful Blue, Crumb Cake (Kraft), Whisper White, Old Olive, and Chocolate Chip cardstock, The Write Stuff Specialty Designer Series Paper (journaling tag)
Accessories/Tools: Button Latte, Crushed Curry 1/2" Polka-Dot Grosgrain Ribbon, Circle Designer Brad, Mini Library Clip, Chocolate Chip Stampin' Write Marker, Color Spritzer, Gold Glow Smooch Spritz, Basic Black Stampin' Write Journaler, Eastern Elegance Rub-ons (retired), White Stampin' Emboss Powder, Heat Tool, Stampin' Sponge
I finally have Jessica's circle journal layout done. I had this 90% done for a couple of months! Can you believe... I really don't know why it took me so long, but oh well. Sorry!
It took me a little while too to figure out what I loved about summer. I am not a big fan of the sweltering summer heat and humidity! I do enjoy going to the beach, especially to watch the sun set.. going to the farmers' market and getting fresh, local produce.. and growing my own veggies!
The strawberries we had bought from a local farmer a few weeks ago. If you've never had fresh, local strawberries that were picked when fully ripened.. you're missing out! There's a lot I could say on the subject, but let's just leave it at that. :) The picture of the tomatoes was taken last summer.. these were some of the first ripening tomatoes in our garden at Seth's parents' house. I'm missing this so much!
The other pictures are from when we went to Nags' Head a couple of summers ago. It was Fluffy's first time at the beach! She was scared of the ocean, and was just content sitting in the sand in the shade. :)
Like my palm tree? I roughly drew the tree trunk on a piece of cardboard from a box, then cut it out and pulled off one of the layers. Then I just inked it up and freehand drew some leaves and cut those out as well. I snipped into the leaves a little to make them more realistic. I think it turned out nicely!
The title letters I simply cut using the Simple Letters Bigz dies and chipboard, then covered with Whisper White Craft ink, embossing with White Stampin' Emboss powder. I created the "sand" by first using the freehand rotary blade in SU!'s Cutter Kit, then roughed up the edges with the distressing tool from the same kit. I then spritzed some Chocolate Chip ink onto it, then sprayed this and the letters with Gold Glow Smooch Spritz. I stamped "things i love..." from the Things I Love stamp set with Crumb Cake ink (new in the new catalog!), and I love how it almost looks like it was drawn in the sand.. if you can draw letters that perfectly. LOL
Here's my sign-in tag.. nothing really special I guess!
I'm in the homestretch for the CJ layouts. I think I have just three more to do - Jenn's, Lisa's, and Jean's!
Hope you like it, Jessica!
Circle journal layout supplies:
Stamps: Things I Love
Ink: Chocolate Chip and Crumb Cake (Kraft) Classic Stampin' Pads, Whisper White Craft Stampin' Pad
Paper: Bashful Blue, Crumb Cake (Kraft), Whisper White, Old Olive, and Chocolate Chip cardstock, The Write Stuff Specialty Designer Series Paper (journaling tag)
Accessories/Tools: Button Latte, Crushed Curry 1/2" Polka-Dot Grosgrain Ribbon, Circle Designer Brad, Mini Library Clip, Chocolate Chip Stampin' Write Marker, Color Spritzer, Gold Glow Smooch Spritz, Basic Black Stampin' Write Journaler, Eastern Elegance Rub-ons (retired), White Stampin' Emboss Powder, Heat Tool, Stampin' Sponge
Circle journal tag supplies:
Stamps: Tart & Tangy
Ink: Chocolate Chip Classic Stampin' Pad
Paper: Whisper White, Pumpkin Pie and Chocolate Chip cardstock, Summer Picnic Designer Series Paper (retired)
Accessories/Tools: Real Red Striped Grosgrain Ribbon, Old Olive 1/2" Library Clip, Old Olive and Real Red Stampin' Write Markers, Vintage Brad, Stampin' Sponge, and Scallop Edge, Word Window, 1-3/8" Circle, and Scallop Circle Punches
Wednesday, June 23, 2010
Because I Care Hearts card
Hello!
I hope you have been enjoying your week so far! Seth's parents may be driving down tomorrow and staying through the weekend. If they do end up coming, I may not get much time to craft at all. :)
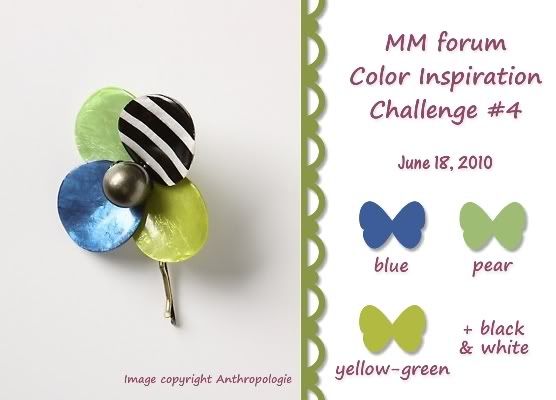
Anyway, I created today's card for the Memory Makers forum color challenge this week. Here are the colors, found on a pretty hair clip from Anthropologie:
And here's my card...
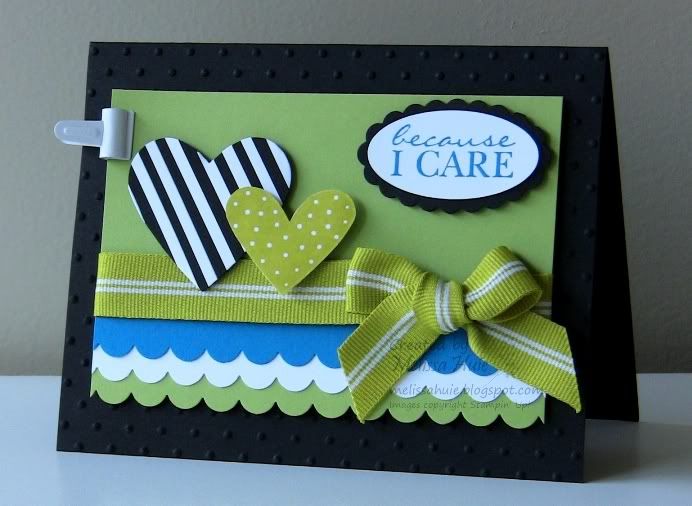
I loved the black and white striped "petal" on the hair clip, and decided to duplicate it on my card. To create this, I cut thin strips of Whisper White, and adhered it to a piece of Basic Black cardstock. I then punched out a heart using the Full Heart punch. The little ruffles at the bottom were just layers of scallop-punched cardstock, and the sentiment is from a new stamp set in the 2010-2011 Idea Book & Catalog, called Because I Care.
By the way... the base green cardstock is a new In Color for this coming catalog, called Pear Pizzazz. Isn't that name cute? I love greens, and this one is so yummy! Makes me crave a fresh, juicy pear!
Well, thanks for stopping by! I need to get the apartment cleaned up!
Because I Care Hearts card:
Stamps: I {Heart} Hearts, Because I Care
Ink: Kiwi Kiss (retired) and Pacific Point Classic Stampin' Pad
Paper: Pear Pizzazz, Basic Black, Pacific Point, and Whisper White cardstock
Accessories/Tools: Whisper White 1/2" Library Clip, Kiwi Kiss Striped Grosgrain Ribbon (retired), Perfect Polka Dots Textured Impressions Folder, and Full Heart, Scallop Edge, Scallop Oval, and Large Oval Punches
I hope you have been enjoying your week so far! Seth's parents may be driving down tomorrow and staying through the weekend. If they do end up coming, I may not get much time to craft at all. :)
Anyway, I created today's card for the Memory Makers forum color challenge this week. Here are the colors, found on a pretty hair clip from Anthropologie:
And here's my card...
I loved the black and white striped "petal" on the hair clip, and decided to duplicate it on my card. To create this, I cut thin strips of Whisper White, and adhered it to a piece of Basic Black cardstock. I then punched out a heart using the Full Heart punch. The little ruffles at the bottom were just layers of scallop-punched cardstock, and the sentiment is from a new stamp set in the 2010-2011 Idea Book & Catalog, called Because I Care.
By the way... the base green cardstock is a new In Color for this coming catalog, called Pear Pizzazz. Isn't that name cute? I love greens, and this one is so yummy! Makes me crave a fresh, juicy pear!
Well, thanks for stopping by! I need to get the apartment cleaned up!
Because I Care Hearts card:
Stamps: I {Heart} Hearts, Because I Care
Ink: Kiwi Kiss (retired) and Pacific Point Classic Stampin' Pad
Paper: Pear Pizzazz, Basic Black, Pacific Point, and Whisper White cardstock
Accessories/Tools: Whisper White 1/2" Library Clip, Kiwi Kiss Striped Grosgrain Ribbon (retired), Perfect Polka Dots Textured Impressions Folder, and Full Heart, Scallop Edge, Scallop Oval, and Large Oval Punches
Saturday, June 19, 2010
Vintage Amour card
Happy Saturday!
Yes, that's right, another card using the Artistic Etchings stamp set! I love French culture and architecture, as well as the language. I studied French for 5 years in school, and seriously considered double-majoring in French and Biology. Anyway, so I just about flipped when I saw this stamp set, and had to have it!
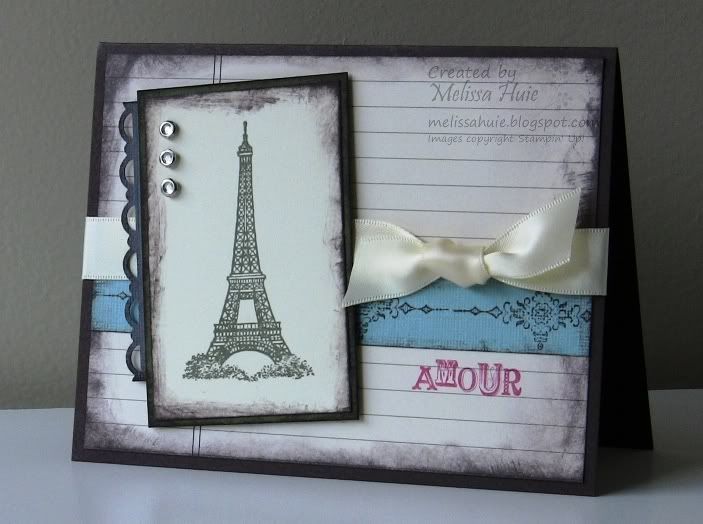
This card just evokes a sense of Parisian elegance and style for me, maybe even Victorian. You're also getting a sneak peek at the new Newsprint Designer Series Paper in the background! I adore this new paper pack, and I'm sure you'll be seeing a lot more of it here. ;) You've seen the Eiffel Tower and "amour" stamp before, and the decorative accent along the blue strip is also from the set. So pretty! (I also love that Baja Breeze is coming back as a core color!)
Hope you have a fantastic weekend! Happy Father's Day to all you Dads out there.
Vintage Amour card supplies:
Stamps: Artistic Etchings
Ink: Always Artichoke, Rose Red and Early Espresso
Paper: Early Espresso, Very Vanilla and Always Artichoke cardstock, Basic Gray and Baja Breeze textured cardstock, Newsprint Designer Series Paper
Accessories/Tools: Very Vanilla 5/8" Satin Ribbon, Clear Rhinestone Brads, Scallop Trim Border Punch, Stampin' Sponge
Yes, that's right, another card using the Artistic Etchings stamp set! I love French culture and architecture, as well as the language. I studied French for 5 years in school, and seriously considered double-majoring in French and Biology. Anyway, so I just about flipped when I saw this stamp set, and had to have it!
This card just evokes a sense of Parisian elegance and style for me, maybe even Victorian. You're also getting a sneak peek at the new Newsprint Designer Series Paper in the background! I adore this new paper pack, and I'm sure you'll be seeing a lot more of it here. ;) You've seen the Eiffel Tower and "amour" stamp before, and the decorative accent along the blue strip is also from the set. So pretty! (I also love that Baja Breeze is coming back as a core color!)
Hope you have a fantastic weekend! Happy Father's Day to all you Dads out there.
Vintage Amour card supplies:
Stamps: Artistic Etchings
Ink: Always Artichoke, Rose Red and Early Espresso
Paper: Early Espresso, Very Vanilla and Always Artichoke cardstock, Basic Gray and Baja Breeze textured cardstock, Newsprint Designer Series Paper
Accessories/Tools: Very Vanilla 5/8" Satin Ribbon, Clear Rhinestone Brads, Scallop Trim Border Punch, Stampin' Sponge
Friday, June 18, 2010
Chocolate Orange Amour!
Haha! I always have so much trouble coming up with names for my cards. I've been hosting color inspiration challenges over at the Memory Makers forum, and this past week our challenge consisted of the following colors:
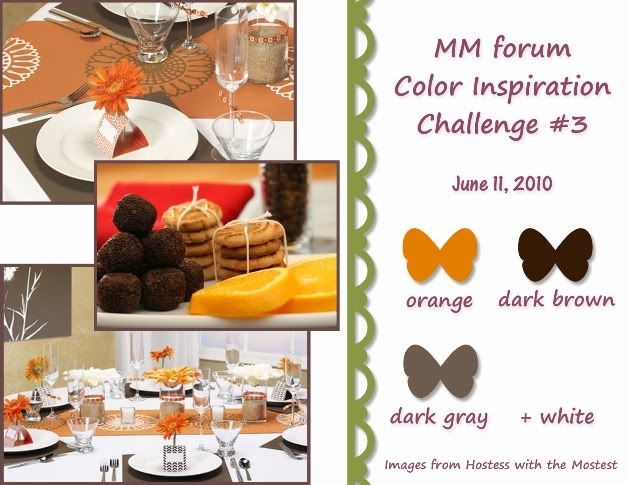
Pretty, right? I don't know if you've ever had chocolate and orange flavors together, but I love 'em myself! And ohh, guess what? I was pleasantly surprised to see that the MM forum site owners chose to feature my color challenge in the newsletter! How awesome is that?
Well enough rambling from me! Here's my card...
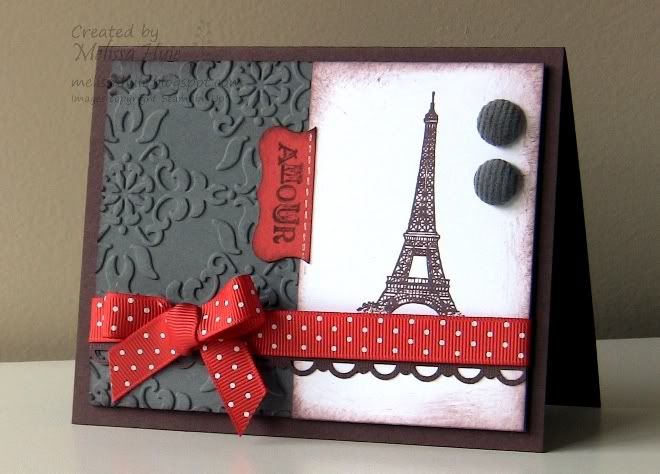
I really wanted to use my pre-order goodies from the new Idea Book & Catalog. I had made another card using this set during my crop earlier this week, but I'll have to show you that later. :)
How scrumptious is that embossing folder? Love it!!
Chocolate Orange Amour:
Stamps: Artistic Etchings
Ink: Chocolate Chip Classic Stampin' Pad
Paper: Chocolate Chip, Basic Gray, Dusty Durango, and Whisper White cardstock
Accessories/Tools: Curly Label and Scallop Trim Border Punches, Basic Gray Corduroy Brads, Dusty Durango 1/2" Polka-Dot Grosgrain Ribbon, Vintage Wallpaper Textured Impressions Folder, Signo White Gel Pen, Big Shot
Pretty, right? I don't know if you've ever had chocolate and orange flavors together, but I love 'em myself! And ohh, guess what? I was pleasantly surprised to see that the MM forum site owners chose to feature my color challenge in the newsletter! How awesome is that?
Well enough rambling from me! Here's my card...
I really wanted to use my pre-order goodies from the new Idea Book & Catalog. I had made another card using this set during my crop earlier this week, but I'll have to show you that later. :)
How scrumptious is that embossing folder? Love it!!
Chocolate Orange Amour:
Stamps: Artistic Etchings
Ink: Chocolate Chip Classic Stampin' Pad
Paper: Chocolate Chip, Basic Gray, Dusty Durango, and Whisper White cardstock
Accessories/Tools: Curly Label and Scallop Trim Border Punches, Basic Gray Corduroy Brads, Dusty Durango 1/2" Polka-Dot Grosgrain Ribbon, Vintage Wallpaper Textured Impressions Folder, Signo White Gel Pen, Big Shot
Thursday, June 17, 2010
cherish scrapbook page
Hello!
I created this layout yesterday and finished it up today. It uses Arielle's gorgeous colourQ challenge this week, and a sketch from PageMaps. I love how it turned out!
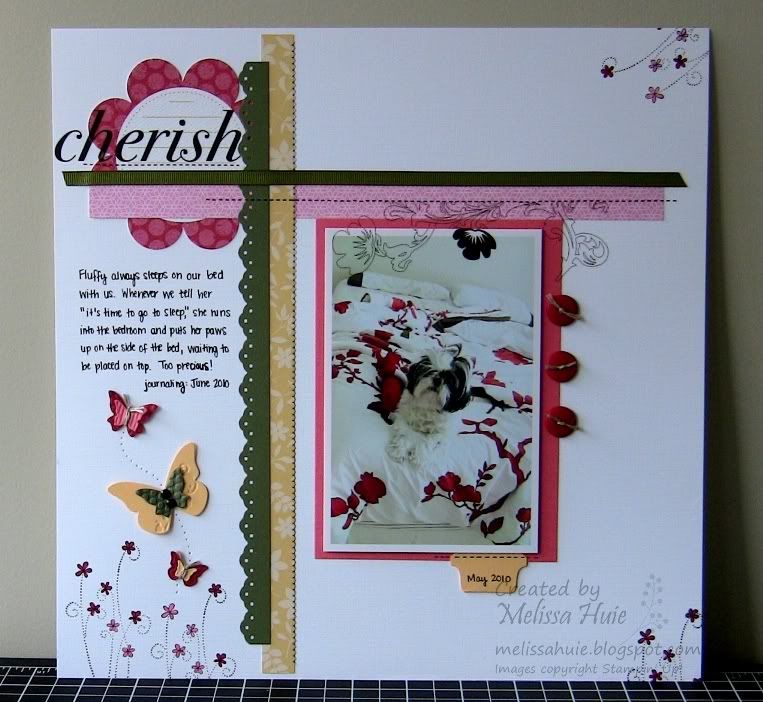
I plan to make this into a 2-page layout, as I have a bunch of pictures I wanted to include here. I added a lot to this page, yet I feel the white background really balances everything.
Journaling reads: "Fluffy always sleeps in our bed with us. Whenever we tell her 'it's time to go to sleep,' she runs into the bedroom and puts her paws up on the side of the bed, waiting to be placed on top. Too precious!"
Well, I have to make this short, as I have a lot of things to get done. Hope you have a wonderful day!
cherish 12" x 12" scrapbook layout supplies:
Stamps: Simply Said
Ink: Jet Black StazOn, Cameo Coral and Ruby Red Classic Stampin' Pads
Paper: Whisper White, Ruby Red and Cameo Coral textured cardstock, Always Artichoke and Apricot Appeal cardstock, Walk in the Park Designer Series Paper (retired), The Write Stuff Specialty Designer Series Paper
Accessories/Tools: Ruby Red buttons (retired), Linen Thread, Always Artichoke 1/4" Grosgrain Ribbon, Cherished Memories Rub-ons (retired), Aqua Painter, Round Tab and Eyelet Border Punches, Beautiful Wings Embosslits die, Basic Black Stampin' Write Journaler, Vintage Brads, Paper Piercing Tool, Big Shot
I created this layout yesterday and finished it up today. It uses Arielle's gorgeous colourQ challenge this week, and a sketch from PageMaps. I love how it turned out!
I plan to make this into a 2-page layout, as I have a bunch of pictures I wanted to include here. I added a lot to this page, yet I feel the white background really balances everything.
Journaling reads: "Fluffy always sleeps in our bed with us. Whenever we tell her 'it's time to go to sleep,' she runs into the bedroom and puts her paws up on the side of the bed, waiting to be placed on top. Too precious!"
Well, I have to make this short, as I have a lot of things to get done. Hope you have a wonderful day!
cherish 12" x 12" scrapbook layout supplies:
Stamps: Simply Said
Ink: Jet Black StazOn, Cameo Coral and Ruby Red Classic Stampin' Pads
Paper: Whisper White, Ruby Red and Cameo Coral textured cardstock, Always Artichoke and Apricot Appeal cardstock, Walk in the Park Designer Series Paper (retired), The Write Stuff Specialty Designer Series Paper
Accessories/Tools: Ruby Red buttons (retired), Linen Thread, Always Artichoke 1/4" Grosgrain Ribbon, Cherished Memories Rub-ons (retired), Aqua Painter, Round Tab and Eyelet Border Punches, Beautiful Wings Embosslits die, Basic Black Stampin' Write Journaler, Vintage Brads, Paper Piercing Tool, Big Shot
Wednesday, June 16, 2010
Western Father's Day card
Hello!
I feel lucky because I got to get together with a couple ladies and crop again today! I always get distracted when I'm trying to craft at home. The only problem with scrapping away from home, though, is that I always manage to forget something. ;) I try to limit myself to just my carry tote (which can fit A LOT, I might add).. especially since my rolling tote broke! Anyhoo, I had a lot of fun, and got a few things done.
I hope my Dad likes his Father's Day card! He might think I'm a little crazy because it's not like he's into Western things, haha. I don't really have any manly stamp sets (that needs to change!), and this is one of the sets they had available for use where we cropped. Oh well, I like it, and I know he'll like it too, if only for the fact that I made it. LOL :)

Lots of distressing on this one as well. I don't know what it is with me and distressing lately (AGAIN!). I created the edge effects by first breaking down the fibers along the edge of the cardstock, then separated the layers of paper, tearing across. Then I inked it all up with Mellow Moss ink. This time I stamped on the Mellow Moss piece with Mellow Moss ink, which gives you the same tone-on-tone look. A great way to make a background!
If you're looking for a unique way to add your sentiment, and you want to break up any linearity you have going.. try creating a tag and tying it to some ribbon or twine, like I did here. I love how this turned out!
Oh, psst.. did you notice that dark, deep brown? It's one of the new core colors coming in the new Idea Book & Catalog, called Early Espresso! I LOVE this new color, and I already know it's one of my favorites!
Don't forget that the Wanted stamp set is retiring this month, along with Mellow Moss cardstock and ink!
Well, thanks for stopping by! Hope you have a fabulous rest of the night!
Western Father's Day card supplies:
Stamps: Wanted, Teeny Tiny Wishes
Ink: Early Espresso, Mellow Moss
Paper: Early Espresso, Mellow Moss, Kraft, Not Quite Navy, and Very Vanilla cardstock
Accessories/Tools: Hemp Twine, Linen Thread, Paper Piercing Tool, Word Window and Spiral Punches, Stampin' Sponge
I feel lucky because I got to get together with a couple ladies and crop again today! I always get distracted when I'm trying to craft at home. The only problem with scrapping away from home, though, is that I always manage to forget something. ;) I try to limit myself to just my carry tote (which can fit A LOT, I might add).. especially since my rolling tote broke! Anyhoo, I had a lot of fun, and got a few things done.
I hope my Dad likes his Father's Day card! He might think I'm a little crazy because it's not like he's into Western things, haha. I don't really have any manly stamp sets (that needs to change!), and this is one of the sets they had available for use where we cropped. Oh well, I like it, and I know he'll like it too, if only for the fact that I made it. LOL :)
Lots of distressing on this one as well. I don't know what it is with me and distressing lately (AGAIN!). I created the edge effects by first breaking down the fibers along the edge of the cardstock, then separated the layers of paper, tearing across. Then I inked it all up with Mellow Moss ink. This time I stamped on the Mellow Moss piece with Mellow Moss ink, which gives you the same tone-on-tone look. A great way to make a background!
If you're looking for a unique way to add your sentiment, and you want to break up any linearity you have going.. try creating a tag and tying it to some ribbon or twine, like I did here. I love how this turned out!
Oh, psst.. did you notice that dark, deep brown? It's one of the new core colors coming in the new Idea Book & Catalog, called Early Espresso! I LOVE this new color, and I already know it's one of my favorites!
Don't forget that the Wanted stamp set is retiring this month, along with Mellow Moss cardstock and ink!
Well, thanks for stopping by! Hope you have a fabulous rest of the night!
Western Father's Day card supplies:
Stamps: Wanted, Teeny Tiny Wishes
Ink: Early Espresso, Mellow Moss
Paper: Early Espresso, Mellow Moss, Kraft, Not Quite Navy, and Very Vanilla cardstock
Accessories/Tools: Hemp Twine, Linen Thread, Paper Piercing Tool, Word Window and Spiral Punches, Stampin' Sponge
Tuesday, June 15, 2010
Journey card
Hi!
Today I have a quick card to show, that I made while at a crop this past weekend. The colors are from Pals Paper Arts' challenge this week:

One of my favorite color combos! I'll miss Bermuda Bay, but I'm so excited that Soft Suede is joining the Color Collections!
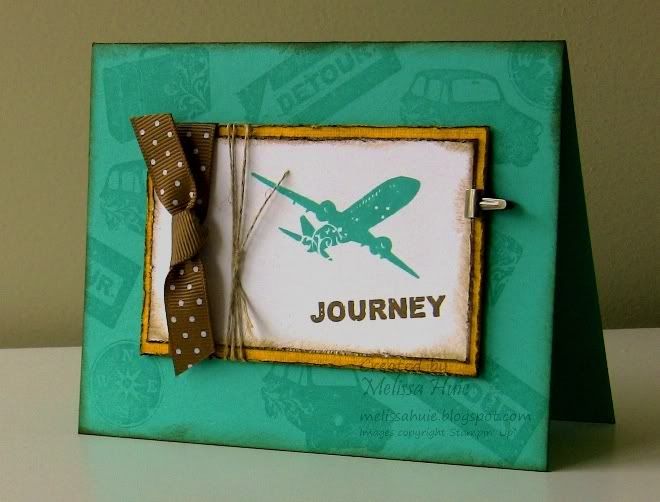
I figured out how to play around more with colors in my photos, so we'll see how that goes! I don't know what it is, probably just the perfectionist in me.. but it bothers me when the colors aren't true to seeing it in real life. This is as close as I could get it! :) Haha, I figure it's probably different on some of you all's screens, so this was probably for nothing. Well, I just won't look at it on another computer to save my own sanity. LOL
Anyway, so this card was created using one of my new stamp sets, Sentimental Journey. I repeatedly stamped images from the set in VersaMark on the card base, and used the plane on my focal piece. Lots of distressing going on here as well.
Journey card supplies:
Stamps: Sentimental Journey
Ink: Soft Suede and Bermuda Bay Classic Stampin' Pads, VersaMark ink
Paper: Bermuda Bay, Crushed Curry and Whisper White cardstock
Accessories/Tools: Linen Thread, Soft Suede 1/2" Polka-Dot Grosgrain Ribbon, Mini Library Clip, Cutter Kit, Stampin' Sponge
Today I have a quick card to show, that I made while at a crop this past weekend. The colors are from Pals Paper Arts' challenge this week:
One of my favorite color combos! I'll miss Bermuda Bay, but I'm so excited that Soft Suede is joining the Color Collections!
I figured out how to play around more with colors in my photos, so we'll see how that goes! I don't know what it is, probably just the perfectionist in me.. but it bothers me when the colors aren't true to seeing it in real life. This is as close as I could get it! :) Haha, I figure it's probably different on some of you all's screens, so this was probably for nothing. Well, I just won't look at it on another computer to save my own sanity. LOL
Anyway, so this card was created using one of my new stamp sets, Sentimental Journey. I repeatedly stamped images from the set in VersaMark on the card base, and used the plane on my focal piece. Lots of distressing going on here as well.
Journey card supplies:
Stamps: Sentimental Journey
Ink: Soft Suede and Bermuda Bay Classic Stampin' Pads, VersaMark ink
Paper: Bermuda Bay, Crushed Curry and Whisper White cardstock
Accessories/Tools: Linen Thread, Soft Suede 1/2" Polka-Dot Grosgrain Ribbon, Mini Library Clip, Cutter Kit, Stampin' Sponge
Monday, June 14, 2010
Blog Hop Project Details
Happy Monday!
I hope you enjoyed this past weekend's Retiring Blog Hop! As promised, here are some more details about my projects...
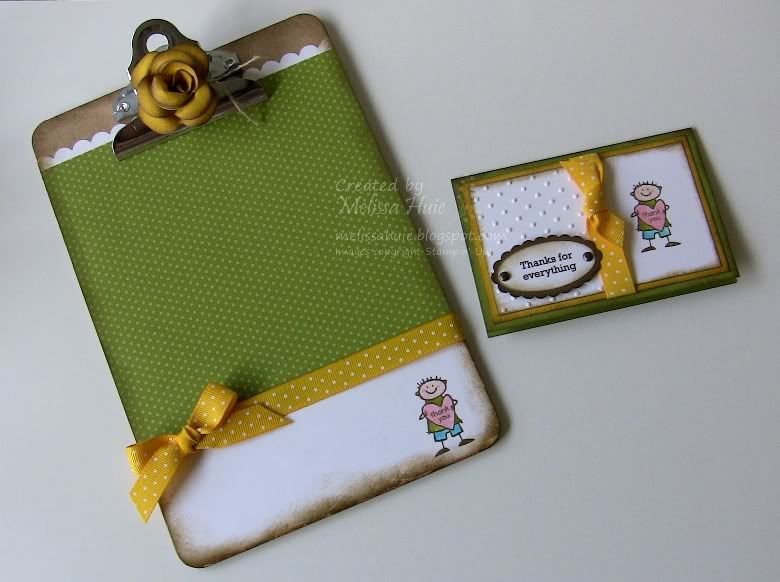
So first off, the altered mini clipboard.. this was so much fun to make! I bought this mini clipboard for a little over a dollar at an office supply store. It's the perfect size for one of those smaller memo pads, or to hang from a wall with a mini calendar or treasured photo.
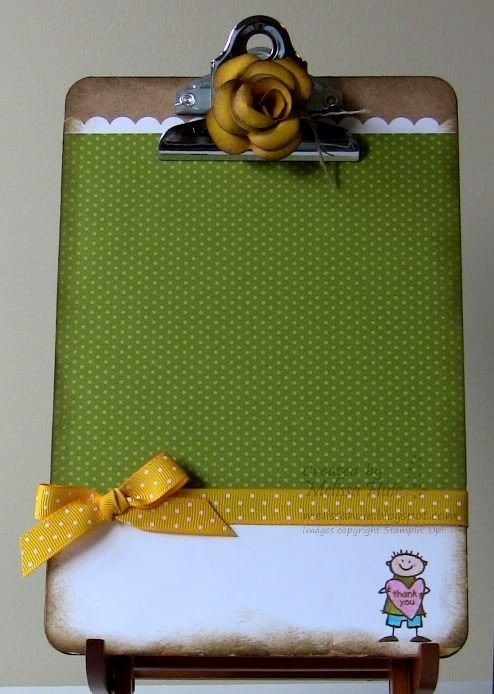
I first measured and cut a piece of Whisper White cardstock, punching the top end with the Scallop Edge Border Punch, then adhered a piece from The Write Stuff Specialty DSP. Make sure you use adequate amounts of adhesive.. you want this to be completely adhered to prevent air bubbles. I then applied a découpage medium to the back of the Whisper White piece, as well as to the clipboard. Next, I laid the paper down, smoothing out all air bubbles with my bone folder. With the help of my Stamp-a-ma-jig, I stamped the little guy from the stamp set in the corner with Soft Suede Classic ink, and colored him in with ink pads/Blender Pen and markers. (Remember that even though Blush Blossom is retiring, SU! will still carry the Stampin' Write marker.) I then inked up the edges of the entire thing with Soft Suede ink and a Stampin' Sponge, and tied some Crushed Curry ribbon along where the DSP ends.
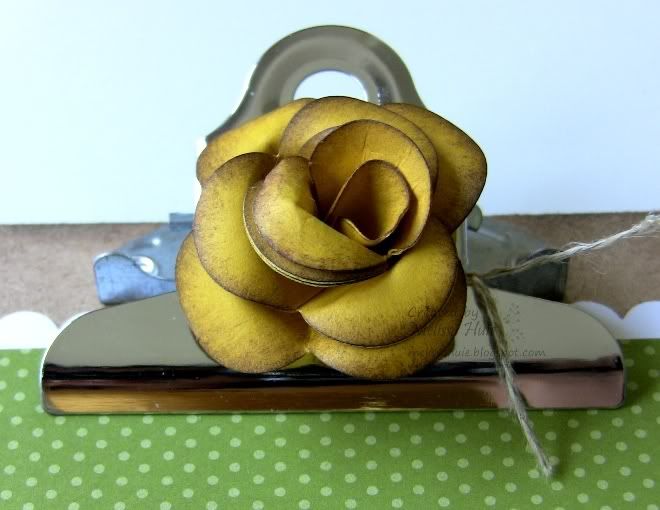
I wanted to cover up the office store's name on the clip, so I decided to try out one of those paper roses I had been seeing everywhere. To create my rose, I actually followed an awesome tutorial by Julie Williams, which you can see here. I tied some Linen Thread around the clip, then attached the rose with some Pop-up Glue Dots. It adds so much to the clipboard, and makes it a little feminine. So cute!
Altered Mini Clipboard supplies:
Stamps: Very Thankful (retiring)
Ink: Soft Suede, Tempting Turquoise and Old Olive Classic Stampin' Pads
Paper: Whisper White and Crushed Curry (retiring) cardstock, The Write Stuff Specialty Designer Series Paper (retiring)
Accessories/Tools: Pretty in Pink and Blush Blossom Stampin' Write Markers, Blender Pen, Linen Thread, Crushed Curry 1/2" Polka-Dot Grosgrain Ribbon (retiring), Scallop Edge Border Punch, Stampin' Sponges
I also created a matching gift card holder, based by Holly K.'s 3-D Challenge over at Stampin' Addicts:
It's very simple! Holly gives instructions and measurements in the link above, so be sure to check it out! I colored the little guy the same way as on the clipboard. I'm not sure if you can see, but I forgot to mention that I gave him little pink cheeks with the marker as well. :)
One of the fabulous things about the Textured Impressions embossing folders is that you can emboss just part of your paper! I love the folders, and I always just have to buy a new one as soon as SU! comes out with another exclusive. When I ran it through, it didn't create a crease there at the end of the embossing (since the paper hangs out of the folder, it may show that part by creasing), but I wanted to set it apart from the image with the Crushed Curry ribbon. I applied a rub-on from the Chit-Chat pack on two lines, then punched it out with the Large Oval punch, matting with the Scallop Oval. Here's the inside view:
I know the Panera Bread gift card doesn't really match, so just imagine it does! I had a Starbucks gift card somewhere here that matched perfectly with my color scheme, but of course I couldn't find it in the wee hours of the morning! LOL Anyway, I created a layer with Soft Suede cardstock, and just eyeballed where the Slit Punch would need to be to hold in the gift card.
By the way, the Slit Punch is retiring, so be sure to snatch one up.. it is just perfect for gift card holders and other projects! I use it all the time! Plus, this gift set would be just perfect for about anything... just change out the stamped images and sentiment, and you're good to go!
Gift Card Holder supplies:
Stamps: Very Thankful (retiring)
Ink: Soft Suede, Tempting Turquoise and Old Olive Classic Stampin' Pads
Paper: Whisper White, Old Olive, Soft Suede, and Crushed Curry (retiring) cardstock
Accessories/Tools: Pretty in Pink and Blush Blossom Stampin' Write Markers, Blender Pen, Crushed Curry 1/2" Polka-Dot Grosgrain Ribbon (retiring), Stampin' Sponges, Vintage Brads (retiring), Chit-Chat Rub-ons (retiring), Perfect Polka Dots Textured Impressions Folder, Big Shot, Slit Punch (retiring), Large Oval Punch, Scallop Oval Punch
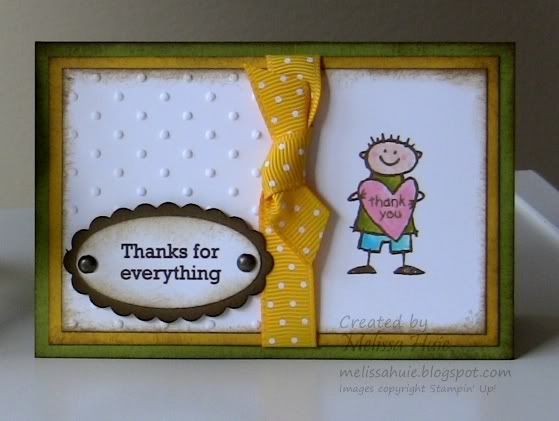
Ok, now here's the standard-sized card I created, using Mojo Monday's sketch #142 and Stampin' Celebration's Inspiration Challenge #6...
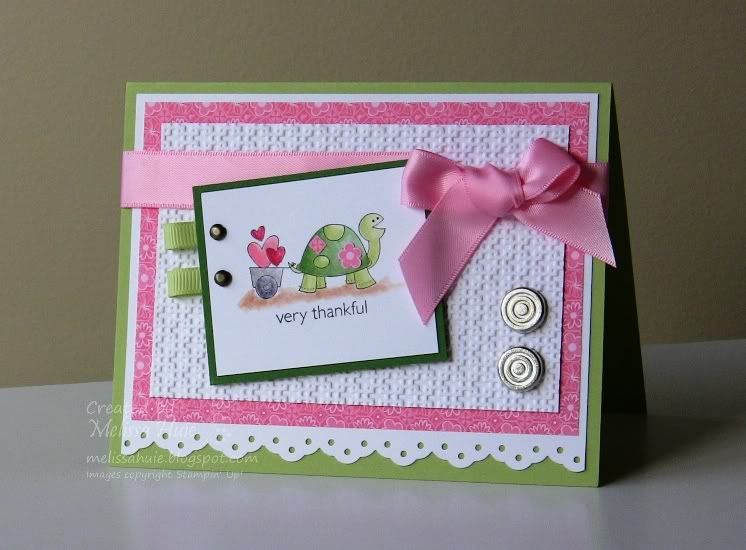
I won't go into too much detail, as I don't want to bore you and you can probably figure out what I did... well, I colored in the cute little turtle and his cart of love with ink pads and a Blender Pen. I then cut out a couple of shapes from the Pink Flamingo DSP (same sheet as behind the embossed piece) and adhered that to the turtle's shell to give it a little something extra. I guess everything else is pretty self-explanatory (maybe??), but let me know if you want to know anything else about it!
Very Thankful card supplies:
Stamps: Very Thankful (retiring)
Ink: Jet Black StazOn ink, and Certainly Celery, Garden Green, Basic Gray, Going Gray, Cameo Coral, Ruby Red, and Creamy Caramel Classic Stampin' Pads (the last 4 are retiring!)
Paper: Pink Flamingo Designer Series Paper (retiring), and Certainly Celery, Garden Green and Whisper White cardstock
Accessories/Tools: Blender Pen, Pretty in Pink 5/8" Satin Ribbon, Certainly Celery 1/4" Grosgrain Ribbon, Circle Designer Brads, Vintage Brads, Square Lattice Textured Impressions Folder, Big Shot, Eyelet Border Punch, Paper Piercing Tool, Mat Pack
On to my next project! This is one of my favorites, as I really love making these Simply Adorned Charm inserts. Here are two photos of the insert.. one inside the charm, and one outside of it:
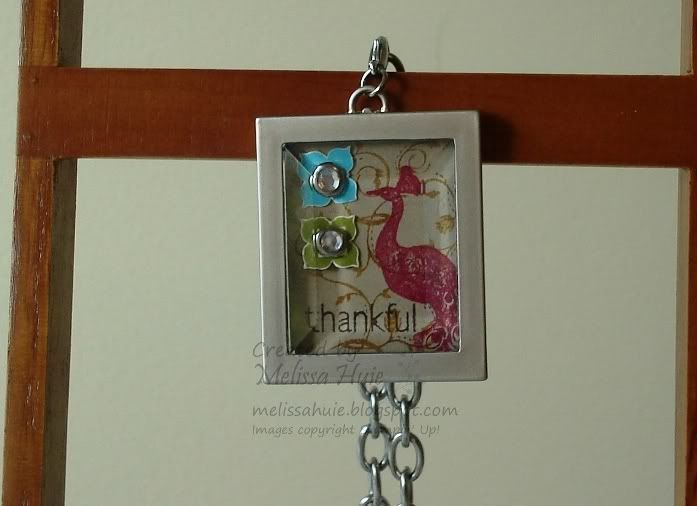

Making this was very simply too! I first cut down a piece of Kraft cardstock to 1" x 1-1/4", then stamped on it several times with More Mustard ink, using the vine part of the peacock stamp. I then stamped just the peacock with Real Red, then layered over the image with the "thankful" part of the turtle stamp (see card above) in Chocolate Chip. Finished it off with a couple of flowers cut from the "Thanks so Much" stamp from the set to create some pretty accents. I cut off the backs of the Small Clear Rhinestone Brads with my Craft & Rubber Scissors (these babies cut through so many different materials!) so that it won't be too thick to fit in the charm, then adhered these with Mini Glue Dots. I love it!
Simply Adorned Charm Insert supplies:
Stamps: Very Thankful (retiring)
Ink: Tempting Turquoise, Old Olive and Chocolate Chip Classic Stampin' Pads
Paper: Kraft and Very Vanilla cardstock
Accessories/Tools: More Mustard and Real Red Stampin' Write Markers, Simply Adorned 1" x 1-1/4" Rectangle Charm, Simply Adorned 18" Chain, Small Clear Rhinestone Brads, Paper Piercing Tool
One more project! Hope you've been sticking with me so far. :) I wanted to show off all of the stamps in the set, so here's the fourth and final one (the flowers are also shown in the above charm insert):
This adorable little card is perfect for tucking in with a gift! I love the look of a clean white card with images stamped in colors. So pretty! To create the rows along the bottom, I paper pierced using the Mat Pack template. I'm glad the Mat Pack isn't retiring.. that's definitely a tool I use a lot too!
Simply Adorned Charm Insert supplies:
Stamps: Very Thankful (retiring)
Ink: Rich Razzleberry Classic Stampin' Pad
Paper: Whisper White, and Soft Suede textured cardstock
Accessories/Tools: Bermuda Bay 1/2" Polka-Dot Grosgrain Ribbon, Paper Piercing Tool, Mat Pack
Thanks for stopping by!
I hope you enjoyed this past weekend's Retiring Blog Hop! As promised, here are some more details about my projects...
So first off, the altered mini clipboard.. this was so much fun to make! I bought this mini clipboard for a little over a dollar at an office supply store. It's the perfect size for one of those smaller memo pads, or to hang from a wall with a mini calendar or treasured photo.
I first measured and cut a piece of Whisper White cardstock, punching the top end with the Scallop Edge Border Punch, then adhered a piece from The Write Stuff Specialty DSP. Make sure you use adequate amounts of adhesive.. you want this to be completely adhered to prevent air bubbles. I then applied a découpage medium to the back of the Whisper White piece, as well as to the clipboard. Next, I laid the paper down, smoothing out all air bubbles with my bone folder. With the help of my Stamp-a-ma-jig, I stamped the little guy from the stamp set in the corner with Soft Suede Classic ink, and colored him in with ink pads/Blender Pen and markers. (Remember that even though Blush Blossom is retiring, SU! will still carry the Stampin' Write marker.) I then inked up the edges of the entire thing with Soft Suede ink and a Stampin' Sponge, and tied some Crushed Curry ribbon along where the DSP ends.
I wanted to cover up the office store's name on the clip, so I decided to try out one of those paper roses I had been seeing everywhere. To create my rose, I actually followed an awesome tutorial by Julie Williams, which you can see here. I tied some Linen Thread around the clip, then attached the rose with some Pop-up Glue Dots. It adds so much to the clipboard, and makes it a little feminine. So cute!
Altered Mini Clipboard supplies:
Stamps: Very Thankful (retiring)
Ink: Soft Suede, Tempting Turquoise and Old Olive Classic Stampin' Pads
Paper: Whisper White and Crushed Curry (retiring) cardstock, The Write Stuff Specialty Designer Series Paper (retiring)
Accessories/Tools: Pretty in Pink and Blush Blossom Stampin' Write Markers, Blender Pen, Linen Thread, Crushed Curry 1/2" Polka-Dot Grosgrain Ribbon (retiring), Scallop Edge Border Punch, Stampin' Sponges
I also created a matching gift card holder, based by Holly K.'s 3-D Challenge over at Stampin' Addicts:
It's very simple! Holly gives instructions and measurements in the link above, so be sure to check it out! I colored the little guy the same way as on the clipboard. I'm not sure if you can see, but I forgot to mention that I gave him little pink cheeks with the marker as well. :)
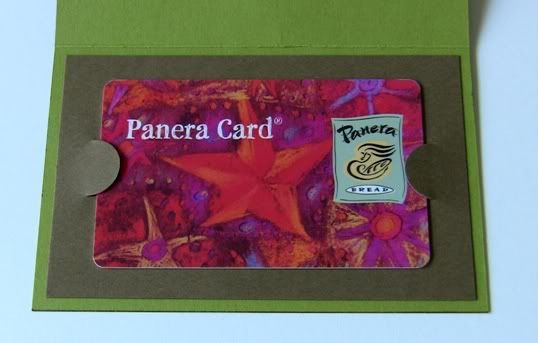
One of the fabulous things about the Textured Impressions embossing folders is that you can emboss just part of your paper! I love the folders, and I always just have to buy a new one as soon as SU! comes out with another exclusive. When I ran it through, it didn't create a crease there at the end of the embossing (since the paper hangs out of the folder, it may show that part by creasing), but I wanted to set it apart from the image with the Crushed Curry ribbon. I applied a rub-on from the Chit-Chat pack on two lines, then punched it out with the Large Oval punch, matting with the Scallop Oval. Here's the inside view:
I know the Panera Bread gift card doesn't really match, so just imagine it does! I had a Starbucks gift card somewhere here that matched perfectly with my color scheme, but of course I couldn't find it in the wee hours of the morning! LOL Anyway, I created a layer with Soft Suede cardstock, and just eyeballed where the Slit Punch would need to be to hold in the gift card.
By the way, the Slit Punch is retiring, so be sure to snatch one up.. it is just perfect for gift card holders and other projects! I use it all the time! Plus, this gift set would be just perfect for about anything... just change out the stamped images and sentiment, and you're good to go!
Gift Card Holder supplies:
Stamps: Very Thankful (retiring)
Ink: Soft Suede, Tempting Turquoise and Old Olive Classic Stampin' Pads
Paper: Whisper White, Old Olive, Soft Suede, and Crushed Curry (retiring) cardstock
Accessories/Tools: Pretty in Pink and Blush Blossom Stampin' Write Markers, Blender Pen, Crushed Curry 1/2" Polka-Dot Grosgrain Ribbon (retiring), Stampin' Sponges, Vintage Brads (retiring), Chit-Chat Rub-ons (retiring), Perfect Polka Dots Textured Impressions Folder, Big Shot, Slit Punch (retiring), Large Oval Punch, Scallop Oval Punch
Ok, now here's the standard-sized card I created, using Mojo Monday's sketch #142 and Stampin' Celebration's Inspiration Challenge #6...
I won't go into too much detail, as I don't want to bore you and you can probably figure out what I did... well, I colored in the cute little turtle and his cart of love with ink pads and a Blender Pen. I then cut out a couple of shapes from the Pink Flamingo DSP (same sheet as behind the embossed piece) and adhered that to the turtle's shell to give it a little something extra. I guess everything else is pretty self-explanatory (maybe??), but let me know if you want to know anything else about it!
Very Thankful card supplies:
Stamps: Very Thankful (retiring)
Ink: Jet Black StazOn ink, and Certainly Celery, Garden Green, Basic Gray, Going Gray, Cameo Coral, Ruby Red, and Creamy Caramel Classic Stampin' Pads (the last 4 are retiring!)
Paper: Pink Flamingo Designer Series Paper (retiring), and Certainly Celery, Garden Green and Whisper White cardstock
Accessories/Tools: Blender Pen, Pretty in Pink 5/8" Satin Ribbon, Certainly Celery 1/4" Grosgrain Ribbon, Circle Designer Brads, Vintage Brads, Square Lattice Textured Impressions Folder, Big Shot, Eyelet Border Punch, Paper Piercing Tool, Mat Pack
On to my next project! This is one of my favorites, as I really love making these Simply Adorned Charm inserts. Here are two photos of the insert.. one inside the charm, and one outside of it:
Making this was very simply too! I first cut down a piece of Kraft cardstock to 1" x 1-1/4", then stamped on it several times with More Mustard ink, using the vine part of the peacock stamp. I then stamped just the peacock with Real Red, then layered over the image with the "thankful" part of the turtle stamp (see card above) in Chocolate Chip. Finished it off with a couple of flowers cut from the "Thanks so Much" stamp from the set to create some pretty accents. I cut off the backs of the Small Clear Rhinestone Brads with my Craft & Rubber Scissors (these babies cut through so many different materials!) so that it won't be too thick to fit in the charm, then adhered these with Mini Glue Dots. I love it!
Simply Adorned Charm Insert supplies:
Stamps: Very Thankful (retiring)
Ink: Tempting Turquoise, Old Olive and Chocolate Chip Classic Stampin' Pads
Paper: Kraft and Very Vanilla cardstock
Accessories/Tools: More Mustard and Real Red Stampin' Write Markers, Simply Adorned 1" x 1-1/4" Rectangle Charm, Simply Adorned 18" Chain, Small Clear Rhinestone Brads, Paper Piercing Tool
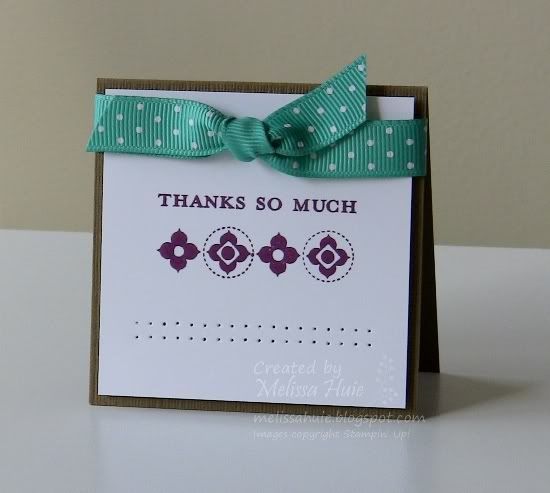
One more project! Hope you've been sticking with me so far. :) I wanted to show off all of the stamps in the set, so here's the fourth and final one (the flowers are also shown in the above charm insert):
This adorable little card is perfect for tucking in with a gift! I love the look of a clean white card with images stamped in colors. So pretty! To create the rows along the bottom, I paper pierced using the Mat Pack template. I'm glad the Mat Pack isn't retiring.. that's definitely a tool I use a lot too!
Simply Adorned Charm Insert supplies:
Stamps: Very Thankful (retiring)
Ink: Rich Razzleberry Classic Stampin' Pad
Paper: Whisper White, and Soft Suede textured cardstock
Accessories/Tools: Bermuda Bay 1/2" Polka-Dot Grosgrain Ribbon, Paper Piercing Tool, Mat Pack
Thanks for stopping by!
And the winner is...

...Carol B.! Congratulations!
Carol b said...
I love the turtle thank you card. The turtle is adorable and the pink ribbon seals the deal.
Carol, please email me your mailing address, and I will get the stamp set out to you ASAP! Please do so within 48 hours, or I'll have to draw another number. :(
Friday, June 11, 2010
Stampin' Addicts Retiring Mega Hop!

Hi!
It's that time again!! Welcome to another Stampin' Addicts blog hop! This hop is all about the stamp sets on the Last Chance Lists (ask your demo for more info), and will run Friday, June 11th, through Sunday, June 13th.
I am stop #27 on the hop! You may have just come from Jason's Stampin' Pad. Didn't you just love what he did with the One of a Kind stamp set? So many different looks! If this is your first stop, don't worry! All of the blogs are linked in a big circle, so you can always find your way around. If you get lost, you can see a complete list of the participating blogs here at Stampin' Addicts!
My projects feature the stamp set Very Thankful. Have you checked out this set yet?? It comes with a great variety of images, each with a different way of saying "thank you", in different fonts. I used it in this way in my projects; however, it's more than just for "thank you" cards! You can easily ink up the images alone and use them for whatever purpose, or even just use the sentiments. And if you purchase this set through your demonstrator, $2 of each sale goes to the Ronald McDonald House Charities! How awesome is that! :)
By the way, I'll just be posting the supply lists for these projects. Be sure to come back on Monday after the hop to read more details! Stick around, because I'm also giving away some scrumptious blog candy!
Here is my first project, a gift set using this cute little guy from the stamp set. You could easily create a girl instead by extending the hair with the coordinating Stampin' Write marker after stamping! This particular gift set would be perfect for a teacher, or anyone else who works with children. The card to the right of the mini clipboard is a gift card holder.. who doesn't like gift cards?
Stamps: Very Thankful
Ink: Soft Suede, Tempting Turquoise and Old Olive Classic Stampin' Pads
Paper: The Write Stuff Specialty Designer Series Paper, and Whisper White, Crushed Curry, Soft Suede, and Old Olive cardstock
Accessories/Tools: Blush Blossom and Pretty in Pink Stampin' Write Markers, Blender Pen, Linen Thread, Crushed Curry 1/2" Polka-Dot Grosgrain Ribbon, Vintage Brads, Chit-Chat Rub-ons, Perfect Polka Dots Textured Impressions Folder, Big Shot, and Fancy Flower XL, Scallop Oval, Large Oval, Slit, and Scallop Edge Punches, Paper Piercing Tool, Mat Pack
My next project is a card using this week's Mojo Monday sketch, with inspiration sparked by this week's Stampin' Celebration challenge!
Very Thankful card supplies:
Stamps: Very Thankful
Ink: Jet Black StazOn ink, and Certainly Celery, Garden Green, Creamy Caramel, Ruby Red, Cameo Coral, Going Gray, and Basic Gray Classic Stampin' Pads
Paper: Pink Flamingo Designer Series Paper, and Certainly Celery, Whisper White and Garden Green cardstock
Accessories/Tools: Blender Pen, Pretty in Pink 5/8" Satin Ribbon, Certainly Celery 1/4" Grosgrain Ribbon, Circle Designer Brads, Vintage Brads, Square Lattice Textured Impressions Folder, Big Shot, Eyelet Border Punch, Paper Piercing Tool, Mat Pack
Onto our next project! Here is a Charm Insert, shown inside the Simply Adorned 1" x 1-1/4" Rectangle Charm. On Monday, I'll have a picture of the insert outside of the charm, so you can see the details more clearly.
Stamps: Very Thankful
Ink: Tempting Turquoise, Old Olive and Chocolate Chip Classic Stampin' Pads
Paper: Kraft and Very Vanilla cardstock
Accessories/Tools: More Mustard and Real Red Stampin' Write Markers, Simply Adorned 1" x 1-1/4" Rectangle Charm, Simply Adorned 18" Chain, Small Clear Rhinestone Brads, Paper Piercing Tool
Last, but not least, I have a clean and simple 3" x 3" card. This size card is great to slip in with a gift!
Stamps: Very Thankful
Ink: Rich Razzleberry Classic Stampin' Pad
Paper: Soft Suede textured and Whisper White cardstock
Accessories/Tools: Bermuda Bay 1/2" Polka-Dot Grosgrain Ribbon, Paper Piercing Tool, Mat Pack
Ok, now about that blog candy! I have an extra Very Thankful stamp set up for grabs! Leave a comment by June 13th, 11:59PM EST telling me what your favorite project is, and I'll use Random.org to pick a lucky winner! Make sure you come back on June 15th, when I'll announce the winner of the stamp set!
I hope you enjoyed my projects using this stamp set.. thanks for stopping by! Your next stop is Sarah's Ink Spot. You'll love her spooky, yet cute, projects! And feel free to join us over at Stampin' Addicts!
Tuesday, June 8, 2010
Upcoming Retiring Product Blog Hop!

Hello!
I've been a little MIA due to a loss of crafty mojo (where are you??) and reorganizing my craft room.
Be on the lookout, as this weekend (beginning June 11th), my friends at Stampin' Addicts and I will be showcasing retiring stamp sets and products. Have you checked out the lists yet? Don't forget that retiring accessories are while supplies last, and some are discounted up to 50% off! Retiring Definitely Decorative items are also 25% off regular price.
Tuesday, June 1, 2010
Last Chance Lists and a special recruiting promo are here!!

Hello!
SU! released their Last Chance (retiring) lists today! Don't wait to get your favorites; some items are even discounted! Here are the lists...
Note that retiring accessories are only available while supplies last, and the PDF will be updated by SU! regularly to reflect sold-out items.
You can place an order directly on my website, or feel free to email me with an order!
Today also marks the beginning of a new recruiting promotion! Join my team during the month of June for just $99 with a Mini Starter Kit! What a fabulous and fairly inexpensive way to start doing what you love.. stamping and sharing! The kit contains stamping and business supplies to help you jump-start your business, with over $120 worth of items. If you'd like to join SU! for the discount on their awesome products, that's ok too! :) Contact me for more info!
I will be back tomorrow with something to share. Have a great rest of the day!
Subscribe to:
Posts (Atom)